
Introduction - CADViewer JS API - Dynamic HighlightToggle Menu
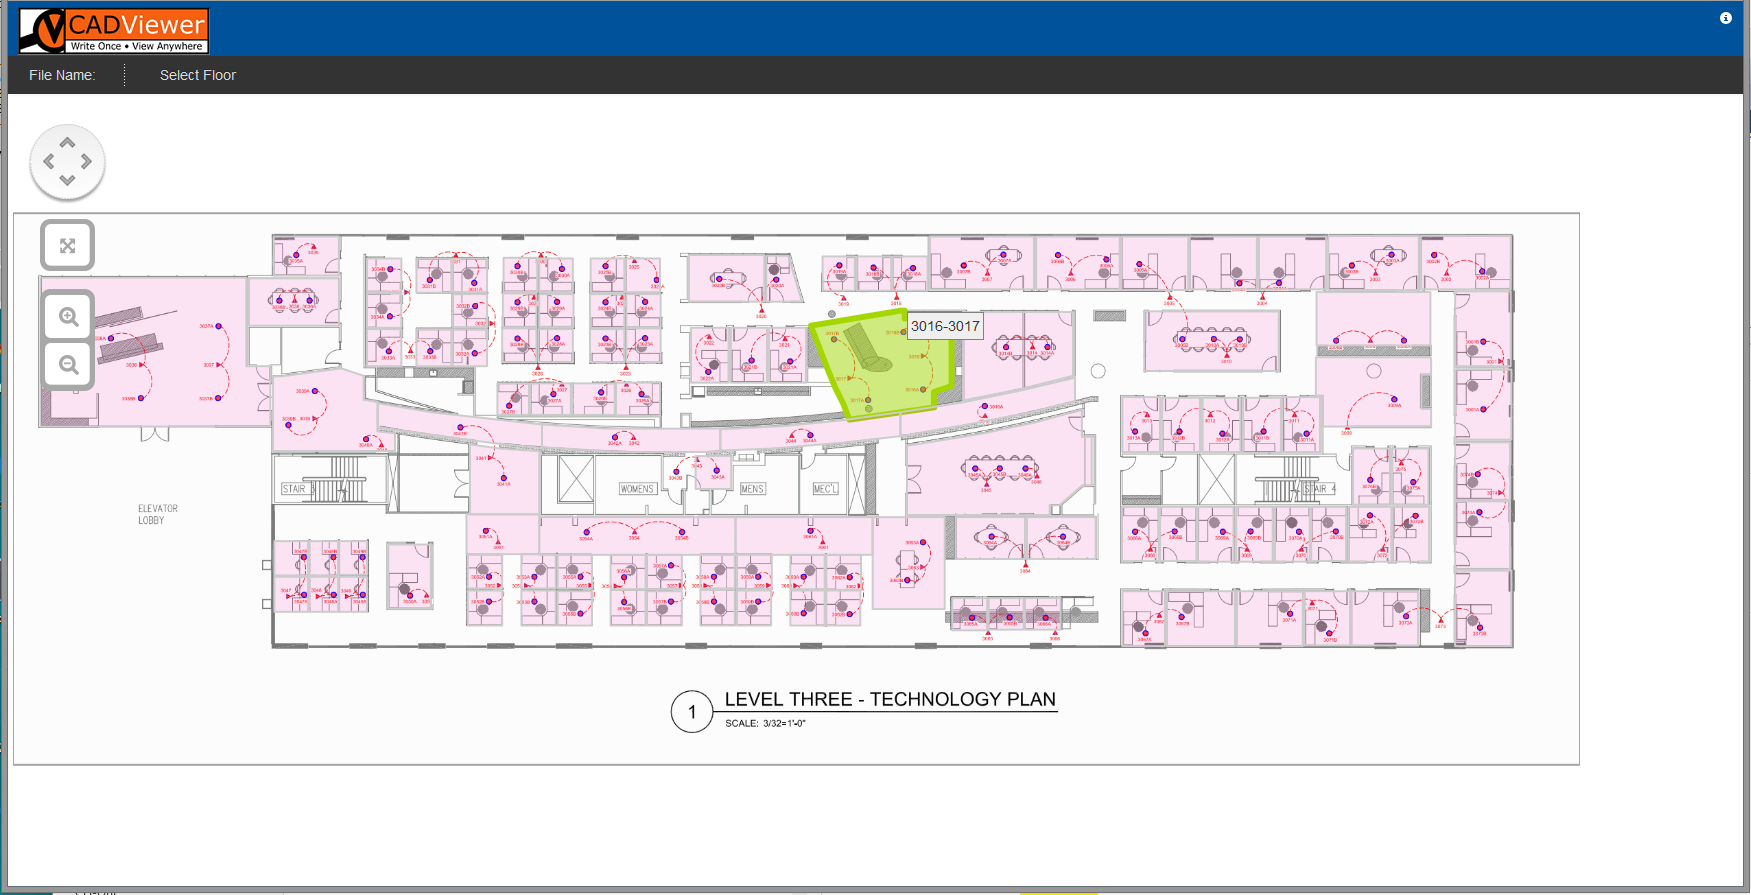
CADViewer JS is an web infrastructure component developed by Tailor Made Software that allows you to plug in CAD and other high resolution floorplans in vector and bitmap format into a webpage and through dynamic highlight interact with objects defined in the drawing. In addition to funtional interaction, CADViewer JS also supports zoom, pan and pinch controls.
Getting Started
It only requires a few basic steps to get started with CADViewer JS Dynamic Highlight. Once you have the basics, continue to the sample below.
Code Sample - Dynamic Highlight
In this sample we will do:
- Load a file from the server.
- Remove a layer in the conversion.
- Match a room layer with a text layer in conversion, so that interactive areas are defined.
- Define a layout on the modal that pops up when selecting an interactive area.
- Define a number of methods that allow us to:
- Hatch a number of room polygons.
- Write lines of text inside room polygons.
- Define the content of modals when doing mouse over on an interactive area.
	<script type="text/javascript">


	var FileNameUrl = "http://creator.vizquery.com/hq17.dwg";
	var FileNameUrlNoExtension = "hq17.dwg";

	function cvjs_OnLoadEnd(){
			// generic callback method, called when the drawing is loaded
			// here you fill in your stuff, call DB, set up arrays, etc..
			// this method MUST be retained as a dummy method! - if not implemeted -

			cvjs_resetZoomPan();
			cvjs_clearDrawingStickyNotes();
			cvjs_clearDrawingRedlines();


			// declare layers for room and text handling
			textLayer1 = cvjs_newLayer(textLayer1);
			roomLayer1 = cvjs_newLayer(roomLayer1);


			// Let us turn off the layer with room text objects
//			cvjs_LayerOff(layer_RM_TXT);
//			cvjs_LayerOff(layers_all);
	}


	// generic callback method, tells which FM object has been clicked
	function cvjs_change_space(){

	}

	function cvjs_saveLocalCopyOfDrawning(){
		window.alert("placeholder for saveLocalCopyOfDrawing - user implementation");
	}

	function cvjs_graphicalObjectCreated(graphicalObject){

	// do something with the graphics object created!
//		window.alert(graphicalObject);


	}


	function cvjs_ObjectSelected(rmid){
	 	// placeholder for method in tms_cadviewerjs_modal_1_0_14.js   - must be removed when in creation mode and using creation modal
	}


	var cvjsPopUpBody;   // The variable for the popup modal
	var roomLayer1;      // The room layer for room highlight
	var textLayer1;	     // The text layer for text in rooms


	// Here we are writing a basic function that will be used in the PopUpMenu
	// this is template on all the good stuff users can add
	function my_own_clickmenu1(){
		var id = cvjs_idObjectClicked();
		//		var node = cvjs_NodeObjectClicked();
		window.alert("Custom menu item 1: Clicked object ID is: "+id);
	}

	// Here we are writing a basic function that will be used in the PopUpMenu
	// this is template on all the good stuff users can add
	function my_own_clickmenu2(){
		//		var id = cvjs_idObjectClicked();
		var node = cvjs_NodeObjectClicked();
		window.alert("Custom menu item 2: Clicked object Node is: "+node);
	}

	// Here I define how the highlight should look like, there are 3 modes, Base, Highlight (mouse over) and Selected
	// Location Base Attribute
		var myCvjsRoomPolygonBaseAttributes = {
					fill: '#FFF',
					"fill-opacity": "0.1",
					stroke: '#AAA',  //  #CCC
					'stroke-width': 1,
					'stroke-opacity': "0.1",
					'stroke-linejoin': 'round'
				};

	// Location Highlight Attribute
		var myCvjsRoomPolygonHighlightAttributes = {
					fill: '#a4e7f4',
					"fill-opacity": "0.5",
					stroke: '#a4e7f4',
					'stroke-width': 3,
					'stroke-opacity': "1"
				};

	// Location Select Attribute
		var myCvjsRoomPolygonSelectAttributes = {   // fill: '#5BBEF6',
					fill: '#5BBEF6',
					"fill-opacity": "0.5",
					stroke: '#5BBEF6',
					'stroke-width': 3,
					'stroke-opacity': "1"
				};


// These are the text styles we are using for the text inside room objects
/** text style for adding text into Space Objects */
var text_style_arial_11pt_bold = {
			'stroke': "#00539B",
			'fill': "#00539B",
			'font-family': "Arial",
			'font-size': "11pt",
			'font-weight': "bold",
			'margin': 0,
			'cursor': "pointer",
			'text-align': "left",
			'z-index': 1980
		};

/** text style for adding text into Space Objects */
var text_style_arial_9pt_normal = {
			'stroke': "#00539B",
			'fill': "#00539B",
			'font-family': "Arial",
			'font-size': "9pt",
			'font-weight': "normal",
			'margin': 0,
			'margin-top': "-10px",
			'cursor': "pointer",
			'text-align': "left",
			'vertical-align': "top",
			'width': "128px",
			'z-index': 1980
		};


/** text style for adding text into Space Objects */
var text_style_dialog = {
			'text-font' : "Dialog",
			'font-family' : "Dialog",
			'font-size' : "7pt",
			'text-anchor' : "start",
			'font-weight': "normal",
			'font-style': "italic",
			stroke : "#88539B",
			fill : "#88539B"
		};


// This is the function that illustrates how to color and label stuff
function color_40objects(){

	var Node_id = "NODE_";
	// We loop over the nodes, we set a hatch pattern on the layer roomLayer1
	var hatchtype = 0;

	for (var i=1; i<40; i++){

		Node_id = "NODE_"+(i)
		hatchtype++;
		if (hatchtype ==7) hatchtype=1;

		if (hatchtype == 1)
				cvjs_ApplyPatternOnSpaceObjectNode(roomLayer1, Node_id, "pattern_45degree_crosshatch_fine", "#550055" , "0.5");
		if (hatchtype == 2)
				cvjs_ApplyPatternOnSpaceObjectNode(roomLayer1, Node_id, "pattern_45degree_standard", "#AA2200" , "0.5");
		if (hatchtype == 3)
				cvjs_ApplyPatternOnSpaceObjectNode(roomLayer1, Node_id, "pattern_135degree_wide", "#0055BB" , "0.5");
		if (hatchtype == 4)
				cvjs_ApplyRelativeLinearGradientStandard3ColorsOnSpaceObjectNode(roomLayer1, Node_id, '#AA2200', '#009922', '#0000FF', "0.7")
		if (hatchtype == 5)
				cvjs_ApplyPatternOnSpaceObjectNode(roomLayer1, Node_id, "pattern_90degree_wide", "#220088" , "0.5");
		if (hatchtype == 6)
				cvjs_ApplyRelativeLinearGradientStandard3ColorsOnSpaceObjectNode(roomLayer1, Node_id, '#FFF', '#00CC00', '#0000FF', "0.4")

	}
}


// This is the function that illustrates how to label text inside room polygons
function txt_40objects(){

	var Node_id = "NODE_";

	// We loop over the nodes, we set a hatch pattern on the layer roomLayer1
	// And we set text objects on the layer textLayer1

	var hatchtype = 0;

	for (var i=1; i<40; i++){

		Node_id = "NODE_"+(i)


		if ((i % 3) ==0){
			var textString = new Array("Hello", "next line is way too long", "line3 is also a bit long");
			var textStyles = new Array(text_style_arial_9pt_normal, text_style_arial_11pt_bold, text_style_dialog);
			var scaleText = new Array(0.15, 0.2, 0.15 );
			var hexColorText = new Array("#AB5500", "#66D200", "#0088DF");

			// here we clip the roomlables so they are inside the room polygon
			cvjs_AddTextAndTBorderOnSpaceObjectNode(textLayer1, Node_id,  0.05, textString, textStyles, scaleText, hexColorText, true);

		}
		else{
			if ((i % 3) == 1){

				var textString = new Array('Hi!', 'Its a bit tooooooooo wide!');
				var textStyles = new Array(text_style_arial_9pt_normal, text_style_dialog);
				var scaleText = new Array(0.20, 0.15 );
				var hexColorText = new Array("#00D2AA", "#AB0055");

				// here we clip the roomlables so they are inside the room polygon
				cvjs_AddTextAndTBorderOnSpaceObjectNode(textLayer1, Node_id,  0.1, textString, textStyles, scaleText, hexColorText, true);

			}
			else{

				var textString = new Array("line 1 line 1 line 1 line 1  ", "line 2 line 2 line 2 line 2", "line 3 line 3 line 3 line 3","line4 line4 line 4 line 4");
				var textStyles = new Array(text_style_arial_9pt_normal, text_style_arial_11pt_bold, text_style_dialog, text_style_arial_9pt_normal);
				var scaleText = new Array(0.15, 0.15, 0.15, 0.15 );
				var hexColorText = new Array("#00AADF", "#AB5500", "#66D244", "#FF00DF");

				// here we clip the roomlables so they are inside the room polygon
				cvjs_AddTextAndTBorderOnSpaceObjectNode(textLayer1, Node_id,  0.03, textString, textStyles, scaleText, hexColorText, true);
			}
		}
	}
}


// This is the function that illustrates how set a custom mouse-over label
function tooltip_40objects(){

	// I am setting the mode to custom tool tips
	cvjs_setCustomToolTip(true);

	// I can extract an array will all the Ids if I like
	var idList = cvjs_getSpaceObjectIdList();
	var ids = "";


	// This loop is to illustrate how tooltips can be set globally.
	// In this case we will instead set them individually from the loop below
	for (var i=0; i<idList.length; i++){
		ids = ids + idList[i]+" ";
		// I can now for the entire drawing set up the tooltip based on each id
		// cvjs_setCustomToolTipValue(idList[i], mytooltipcontent);
		// instead I will use the loop below and set the tooltip each time I set room legends
	}
	// window.alert(ids);


	var Node_id = "NODE_";
	// We loop over the nodes, we set a text object on each mouseover modal for each room


	for (var i=1; i<40; i++){

		Node_id = "NODE_"+(i)
		if ((i % 3) ==0){
			var textString = new Array("Hello", "next line is way too long", "line3 is also a bit long");

			// here I set the tooltip to the same as the room labels
			var myId = cvjs_getSpaceObjectIdfromNode(Node_id);
			cvjs_setCustomToolTipValue(myId, textString);
		}
		else{
			if ((i % 3) == 1){
				var textString = new Array('Hi!', 'Its a bit tooooooooo wide!');

				// here I set the tooltip to the same as the room labels
				var myId = cvjs_getSpaceObjectIdfromNode(Node_id);
				cvjs_setCustomToolTipValue(myId, textString);
			}
			else{
				var textString = new Array("line 1 line 1 line 1 line 1  ", "line 2 line 2 line 2 line 2", "line 3 line 3 line 3 line 3","line4 line4 line 4 line 4");

				// here I set the tooltip to the same as the room labels
				var myId = cvjs_getSpaceObjectIdfromNode(Node_id);
				cvjs_setCustomToolTipValue(myId, textString);
			}
		}
	}
}


function clear_label_colors_40objects(){

	roomLayer1 = cvjs_clearLayer(roomLayer1);


	// We use the command clearTextLayer, as the text objects are placed in a special structure
	// so they dynamically can be changed (see next example)
	textLayer1 = cvjs_clearTextLayer(textLayer1);

}


	$(document).ready(function()
		{


		if (!isSmartPhoneOrTablet)
			$('#gMenu').html("<img src=\"../images/cvjsToolbar_9t.png\" style=\"margin-left: 10px; margin-top: 10px;\" usemap=\"#cvjsToolbarMap_1\" border=\"0\" height=\"247\" width=\"62\" class=\"map\" hidefocus=\"true\">");
		else
			$('#gMenu').html("<img src=\"../images/PanZoomWindowFullPages7t.png\" usemap=\"#PanZoomMap\" border=\"0\" height=\"363\" width=\"78\" class=\"map\" hidefocus=\"true\">");


		cvjs_setLicenseKeyPath("../javascripts/");

		cvjs_setStickyNoteRedlineUrl("../redlines/filename-red_t1.js");
		cvjs_setStickyNoteSaveRedlineUrl("../redlines/filename-red_s1.js");

		cvjs_setPanState(true);


		cvjs_debugMode(true);

//		cvjs_setUrl_singleDoubleClick(1);
//		cvjs_encapsulateUrl_callback(true);

//		cvjs_conversion_setContentResponse("file");


		// In the initialization process, we are telling CADViewer JS how to build the modal
		// that will hihglight when we do mouse over, and how it will look when we click upon it

		cvjsPopUpBody = "<div class=\"cvjs_modal_1\" onclick=\"my_own_clickmenu1();\">Custom<br>Menu 1<br><i class=\"glyphicon glyphicon-transfer\"></i></div>";
		cvjsPopUpBody += "<div class=\"cvjs_modal_1\" onclick=\"my_own_clickmenu2();\">Custom<br>Menu 2<br><i class=\"glyphicon glyphicon-info-sign\"></i></div>";
		cvjsPopUpBody += "<div class=\"cvjs_modal_1\" onclick=\"cvjs_zoomHere();\">Zoom<br>Here>br><i class=\"glyphicon glyphicon-zoom-in\"></i></div>";

		//  Initialize CADViewer JS
		//  We Initalize CADViewer JS, in this case we tell which modal to use and what colors to display
		cvjs_InitCADViewerJS_highLight_popUp("floorPlan", myCvjsRoomPolygonBaseAttributes, myCvjsRoomPolygonHighlightAttributes, myCvjsRoomPolygonSelectAttributes, cvjsPopUpBody );


		// To set up the drawing for dynamic highlight, we set the layers of the room polygons and the room text that we want to merge into clickable objects
		// The room polygons are on layer $RM and the room text is on the layer RM$TXT (the same layer that we turn off in the conversion)
		cvjs_conversion_addAXconversionParameter("tl", "RM$TXT");
		cvjs_conversion_addAXconversionParameter("rl", "RM$");


		// I also want to remove layer RM$TXT in the conversion, this layer puts text in the rooms, and we want to get rid of this text to make our own labels
		cvjs_conversion_addAXconversionParameter("PARTOFF", "RM$TXT");


		//  We load the file via a server side conversion
		cvjs_LoadDrawing_Conversion("floorPlan", FileNameUrl, FileNameUrlNoExtension, "", "");

	    cvjs_windowResize_position(false, "floorPlan" );

        });  // end ready()

        $(window).resize(function() {
			cvjs_windowResize_position(true, "floorPlan" );
        });


// this method is linked to the save redline icon in the imagemap
function cvjs_saveStickyNotesRedlinesUser(){

	// custom method startMethodRed to set the name and location of redline to save
	// see implementation below
	startMethodRed();

	// API call to save stickynotes and redlines
	cvjs_saveStickyNotesRedlines();
}


// this method is linked to the load redline icon in the imagemap
function cvjs_loadStickyNotesRedlinesUser(){

	// first the drawing needs to be cleared of stickynotes and redlines
	cvjs_deleteAllStickyNotes();
	cvjs_deleteAllRedlines();

	// custom method startMethodRed to set the name and location of redline to load
	// see implementation below
	startMethodRed();

	// API call to load stickynotes and redlines
	cvjs_loadStickyNotesRedlines();
}


function startMethodRed(){

	var v1 = $('#load_redline_url').val();
	var v2 = $('#save_redline_url').val();

	v1 = "../redlines/"+v1;
	v2 = "../redlines/"+v2;

	cvjs_setStickyNoteRedlineUrl(v1);
	cvjs_setStickyNoteSaveRedlineUrl(v2);
}


function set_print_controls(){

	var p_size = $('#print_papersize').val();
	var p_dpi = $('#print_resolution').val();
	var p_orientation = $('#print_orientation').val();

	window.alert("clicked set print controls "+p_size+" "+p_dpi+" "+p_orientation);

	cvjs_setPrintResolutionDpi(p_dpi);
	cvjs_setPrintPaperSize(p_size);
	cvjs_setPrintOrientation(p_orientation);

}

 	</script>
Online Demo and Download
For online demo and download of CADViewer JS set up for redlining and annotation, please use the links below:
Online Demo
View online at: Dynamic Highlight Demo
Download Trial
Download from: CV-JS_2_1_dynamic_highlight_02.zip